Well not the dusted bit, except I did scrub clean the bathroom today!! No, the Christmas shopping is done and the cards are made. Yippee! 'cos now I can spend the next 12 days making Tim's 12 tags of Christmas.
Have you noticed how quiet he has been this week? I reckon he has managed to get ahead of himself this year and completed some tags already.
I have 2 full sets of ink cartridges ready for when the ones already in my printer run out, as I always print off the instructions and make a binder so that I have a reference of techniques, despite having Tim's book.
So, roll on tomorrow and let the fun (and no doubt the odd tear) begin. Good luck to all participants.
Amended to say that Tim has just posted about the start of the 12 tags and he has confirmed that he makes his tags each day, setting himself the midnight deadline so that we all get to see it for a full 24hrs. What an amazing man he is.

Tuesday, 30 November 2010
Sunday, 28 November 2010
SOMETHING COMPLETELY DIFFERENT - SNOW
Pop over to the SCD blog for details of this week's challenge - Snow.
I missed the last couple of challenges but had this one in mind to do anyway, so it fits perfectly.
 This is the last of the large cards that Sonia kindly gave me and I've loved using them.
The base is brown corrugated card generously smeared with gesso, fine glitter, white flower soft and some gorgeous Martha Stewart stars glitter. It took ages to dry though. The red card is simply torn and stamped with Tim's snowflake and snowman stamps in Brilliance moonlight white. The letters are coloured with gold dabber and are grungeboard in different fonts.
The gorgeous Tim pine tree was die cut and coloured with forest moss DI. I dried this with a heat gun before adding some gesso for snow. However, this morning was a shock because the snow had turned green! I started again and added some flower soft but that turned green too! As a last resort I lavishly applied frosted lace stickles. It's not quite dry yet but still looks green to me.
The picket fence is Tim's on the edge die as I adore this one. I cut it from grunge paper - as the tree - coloured it with brushed corduroy DI and gave it the gesso, flower soft and glitter treatment. This has stayed white!
An embellishment and aged mahogony DI round the edge finished it off.
I missed the last couple of challenges but had this one in mind to do anyway, so it fits perfectly.

The base is brown corrugated card generously smeared with gesso, fine glitter, white flower soft and some gorgeous Martha Stewart stars glitter. It took ages to dry though. The red card is simply torn and stamped with Tim's snowflake and snowman stamps in Brilliance moonlight white. The letters are coloured with gold dabber and are grungeboard in different fonts.
The gorgeous Tim pine tree was die cut and coloured with forest moss DI. I dried this with a heat gun before adding some gesso for snow. However, this morning was a shock because the snow had turned green! I started again and added some flower soft but that turned green too! As a last resort I lavishly applied frosted lace stickles. It's not quite dry yet but still looks green to me.
The picket fence is Tim's on the edge die as I adore this one. I cut it from grunge paper - as the tree - coloured it with brushed corduroy DI and gave it the gesso, flower soft and glitter treatment. This has stayed white!
An embellishment and aged mahogony DI round the edge finished it off.
Saturday, 27 November 2010
WAXED SANTA

Because I used the second to last big card that Sonia gave me, and it has a wavy edge, I thought I should round the corners of the inked matt. Can I find my corner rounder anywhere? I've no idea where it is so I used a circle punch and got an inverted look instead.
The reindeers are Tim's from his reindeer flight die. I managed to cut some whole ones and some part ones from the music paper I had. The part one looks ok behind. However, I've just found a massive A3 sheet of music paper that I had completely forgotten about. That big clearout is now way overdue.
The ribbon matches too and is sticky backed. I reverted to my latest fave technique - wax - to stick the image to the matt. I left santa without a covering and added distress stickles to his clothes instead. A bit of rock candy stickles on the snow finished it off.
I'm just going to attempt another with the last of the big cards, that's if my bad back holds out! Must have twisted it in the night because I got up with it this morning. Oh well!
Thursday, 25 November 2010
HE'S DOING IT AGAIN
Yes! The most fabulous MR TIM HOLTZ is sharing
THE 12 TAGS OF CHRISTMAS
with us again this year.
Will you be joining in with the fun????
 My tags from last year.
THE 12 TAGS OF CHRISTMAS
with us again this year.
Will you be joining in with the fun????
Wednesday, 24 November 2010
CRIMBO CARDS
I made a couple more cards, last night actually, after I wrote my woyww post for today, that's why they weren't on it..

This image has been on my image folder since last year but I've never used it 'til now. It's a simple card because of that but nothing is simple about the gorgeous Snow Flurries on the edge die from the master himself. It cuts really well for something so complicated.
The little girl has a blue skirt so I have used a piece of matching card on the edge of the inside to show off the snowflakes which in turn are covered in ice stickles. I added a bit of distress stickles to the image after matting and layering it to the main card. The large snowflake is from a Xmas card from last year!
 This card has turned out better than I could have wished. It's 6"x6". The matt is 5.5"sq. Again I have used a vintage image from my stock but I distressed the matt using colours that matched the image and in the same situation. After that I stamped Tim's fir stamp in forest moss to one side and his scroll in aged mahogony to the other. The sentiment is one I use often, simply gold embossed. I used wax to stick the image to the card and give some interest. It's a technique I now absolutely love. Once cool, I added some distress stickles to Santa's coat, roughed the edges, darkened them with walnut stain, added a metal star and........... well no, it's actually not been stuck down yet.
To be perfectly honest, 'peg leg' and I (mainly him) are so 'down' that his knee operation was cancelled at the last minute, that neither of us have even got dressed today. I know that's awful, but we have both spent the day on our computers instead of doing anything else. Never, ever done that before.
This hospital lark is just that -a lark.

This image has been on my image folder since last year but I've never used it 'til now. It's a simple card because of that but nothing is simple about the gorgeous Snow Flurries on the edge die from the master himself. It cuts really well for something so complicated.
The little girl has a blue skirt so I have used a piece of matching card on the edge of the inside to show off the snowflakes which in turn are covered in ice stickles. I added a bit of distress stickles to the image after matting and layering it to the main card. The large snowflake is from a Xmas card from last year!

To be perfectly honest, 'peg leg' and I (mainly him) are so 'down' that his knee operation was cancelled at the last minute, that neither of us have even got dressed today. I know that's awful, but we have both spent the day on our computers instead of doing anything else. Never, ever done that before.
This hospital lark is just that -a lark.
WOYWW ISN'T 'PEG LEG' CLEVER
Despite waiting to go in hospital - which incidently, didn't happen 'cos they cancelled at the last minute!!!!!!!!!!!!!! - 'peg leg' made me this:

 24 blending tools plus holder.
He had already made me an 8 tool holder that sits on my work desk which he is going to alter into a 16 one. This means that I have 36 - one for each distress ink. I don't have to change the pads now because each tool has it's own.
Not only will it stand on my work desk, but it hangs from the ceiling when not being used. How clever is that


I worked out the cost of making 36 blending tools and 2 holders, including the foam pads but excluding the wood, which he already had, and it came to about £41.
The cost of 36 Ranger blending tools and 5 holders is about £280!!!!!
I think I did well there. We spent ages putting labels on the tools and

we even labelled all my distress inks too

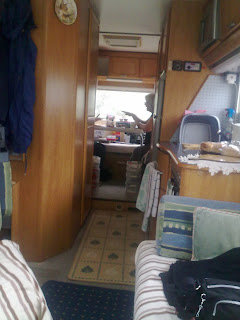
Some of you have been asking me how I access my washer and drier after I showed you this photo last week


Now, for peeps at other craft rooms, pop over to Julia's, click on a name from the list and have a good 'ol nosey around. I actually managed 80 last week! Take care.
Monday, 22 November 2010
I DON'T BELIEVE IT!!!!!!!
In the words of Victor Meldrew, I don't believe it.
'Peg leg' has his knee operation tomorrow - OH NO HE DOESN'T!!!!!!!!!!!!!!!
We had a phone call from the hospital this morning to cancel it.
This has been going on for 2 years now. They reckon the next appointment will be in the New Year.
If all this wasn't true and I told you the tale, you would be saying 'I don't believe it'.
Sunday, 21 November 2010
I AM RICH - I HAVE GOLD
It's true, at long last I have gold. Well flowers actually, but not just any old flowers - if they were old flowers they would be shrivelled and on the compost heap lol - no, my flowers are pure gold, perfectly formed and come in different sizes. They are a vision of lovliness and have been in my mind for some time, so when the opportunity to own them came along, I jumped in there and now they are mine.
I'm wafflin' on so here they are:
 Do any of you recognise this amazing piece of art??? You must surely recognise the perfect gold flowers.
Yes - it's a wonderful creation by the equally wonderful Hels Sheridan.
If you are a fan too or just want to own one of her other fabulous creations, simply pop over to her blog and look at her Folksy shop. I can promise that you will not be disappointed.
Just off to lovingly stroke and oodle over my gold now.
I'm wafflin' on so here they are:

Yes - it's a wonderful creation by the equally wonderful Hels Sheridan.
If you are a fan too or just want to own one of her other fabulous creations, simply pop over to her blog and look at her Folksy shop. I can promise that you will not be disappointed.
Just off to lovingly stroke and oodle over my gold now.
Wednesday, 17 November 2010
A SPECIAL HAPPY BIRTHDAY WOYWW
What and who? It's my special son's birthday today. A baby at 42!!! - well he's my baby anyway - but this is even more of a special birthday for him because it's his first as a Daddy. 2 beautiful children came into his /our life at the beginning of this year and have settled really well, so this is why today is special.
But - today is when we also get to fly around the world and see the clutter/mess/tidiness/beautiful creations/ amazing spaces/new craft stash, etc. etc. All because the amazing Julia thought up this wonderful trip.
I have tried, in vain I must add, to get around every single one each week, but have never managed so far. The aim is not that, but to have a peep at as many as you can. Trouble is, I WANT to get round them all 'cos I'm nosey!
Anyway, my desk looks like this.
 Not a bit of action in sight. I have been making cards and ATCs, but had a good ol' clear up because 'peg leg' has a string of both doctor and hospital appointments just now, prior to his knee op next Tuesday - hooraaaaay!! so I don't have long spells of time just now.
 I have to admit I took these photos last night, hence the light being on. I wonder whether you can spot my 'just arrived' Tim paper rosette die. Been after this since I saw the wonderful creations on so many blogs. I thought it would be something very much American, but no. Have you seen the gorgeous Xmas trees made with it, the delicate borders, the flowers etc.? I can't wait to play.
 This rather bad photo shows my right hand wall.
The cupboards house all sorts of stuff but mainly, glues, brads, embossing folders, sticky gems, etc. etc. You can also see my top shelf with the boxes housing ribbons, material scraps and some swapped ATCs.
My tv and freeview Sky box is on the right. That's right - I have freeview Sky. 'Peg leg' got the card for me years ago from the BBC. They are only available now if you pay! The monitor is one we bought for the motorhome, 12vt/mains, and is also a pc monitor, but I keep it in my room now. All my Tim dies are on the shelf under my Big Shot and my Martha Stewart punches are hanging underneath or on the shelf by the side.
The drop down to my work area is where I compute but the bit to the left is 12" higher to go over the washer!
 This shot is from the entrance. You can see the room is tiny but all the space is used.
The doors to the left hide the boiler and dryer plus a large cupboard full of more craft - yeh!!
I have to move the storage at the far end in order to use the washer.
I love my little room and spend as much time in it as I can spare. I hope I haven't bored you with this post but rather given you an insight into my 'crafty life'
But - today is when we also get to fly around the world and see the clutter/mess/tidiness/beautiful creations/ amazing spaces/new craft stash, etc. etc. All because the amazing Julia thought up this wonderful trip.
I have tried, in vain I must add, to get around every single one each week, but have never managed so far. The aim is not that, but to have a peep at as many as you can. Trouble is, I WANT to get round them all 'cos I'm nosey!
Anyway, my desk looks like this.


The cupboards house all sorts of stuff but mainly, glues, brads, embossing folders, sticky gems, etc. etc. You can also see my top shelf with the boxes housing ribbons, material scraps and some swapped ATCs.
My tv and freeview Sky box is on the right. That's right - I have freeview Sky. 'Peg leg' got the card for me years ago from the BBC. They are only available now if you pay! The monitor is one we bought for the motorhome, 12vt/mains, and is also a pc monitor, but I keep it in my room now. All my Tim dies are on the shelf under my Big Shot and my Martha Stewart punches are hanging underneath or on the shelf by the side.
The drop down to my work area is where I compute but the bit to the left is 12" higher to go over the washer!

The doors to the left hide the boiler and dryer plus a large cupboard full of more craft - yeh!!
I have to move the storage at the far end in order to use the washer.
I love my little room and spend as much time in it as I can spare. I hope I haven't bored you with this post but rather given you an insight into my 'crafty life'
Tuesday, 16 November 2010
CHRISTMAS ATCs
In between all these doctor and hospital appointments that 'peg leg' has just now, I keep popping into my little room and trying to 'create'. He has another trip to the hospital today - would you believe after 5pm! - for yet another pre-op test.
I thought I should make a few Christmas ATCs to swap when I see any of the girls, especially as my stock has virtually disappeared.
 I noticed on Tim's blog that he had made a tag which looked 'scrunched' and distressed. However, on closer view it was checkered. No idea how he had done it unless it was a texture fade embossing folder. Anyway, I folded some card kind of concertina-like both ways, then using frayed burlap, I distressed over it. It kind of worked. I stamped the trees in archival black, quite lightly, then painted over them with forest moss and pine needles. The forest moss ones then had a coat of glossy accents. I 'flicked' pearl mixatives over the whole thing, added a reindeer charm, some cord and edged the card - after sticking it to mount board - with walnut stain.
 This was fun. I had a Santa image from my free download folder, which I cut round so I only had his face and shoulders. I had kept all the little bits of Tim's paper from his retro grunge stack after having cut out loads of small flowers. I simply stuck bits all over some mount board using matt medium. The swirl piece in the middle is a 1" square from the stack. I stuck Santa in the middle and also the torn dictionary Santa Claus definition. I then used distress embossing ink all round the edges and sprinkled it with cinnamon powder. Boy does that smell good when you heat it. Some rock candy stickles on the words and some Xmas stickles on Santa's hat finished it off.
 This one was inspired by the stamp that I found in my 'scrap' drawer. I used my quickie glue pen to draw lines on some heatable acetate before sprinkling black embossing powder on and heating it up to form the basis of my stained glass. I left all the little bits of powder instead of brushing them off. I then used Sakura pens to colour each area on the reverse. Once dry, which was after the first episode of Corrie and before the second!!!!!!!!!! I stuck it to some mount board using a small amount of glossy accents around the edge. Some black stickles round the edge of the top covered where the glossy accents had taken the Sakura off. Then I simply stuck the stamp on - job done. Not sure when I shall get the chance to make any more as this and next week are chaotic.
I thought I should make a few Christmas ATCs to swap when I see any of the girls, especially as my stock has virtually disappeared.


Sunday, 14 November 2010
SANTA CLAUS IS COMING TO TOWN
That's the theme for this week's challenge over at the Sunday Stampers. Pop over and have a look because Hels has made a fabulous little advent book.
I decided to make another Xmas card.
 The Santa is a free download that has been in my image folder for ages. Isn't he a jolly man? I took the colours for the background from the colours on the image and they look really good together. I just spread them on my craft sheet, spritzed them with water and dabbed my card into the ink. I sprayed some perfect pearls mixture over it all before stamping the Tim scroll in pumice stone and fired brick. I have loads of grommets and eyelets and the one I used says 'made with love'.
I had made the charm some weeks ago and knew who I was making it for then! The final touch was to use some wax - at long last - to stick the picture to the card.
I am really pleased with this card because it came together without any mishaps and the colours go so well.
Finally, I seem to be getting my head above water with the craft scene of late. I made a dozen general Xmas cards yesterday so can concentrate on the 'special' ones again before tackling Sheila's chunky book pages once more. All this and the 12 days of Christmas will be here before we know it. My dilemma is whether to have a go again this year!!!......
I decided to make another Xmas card.

I had made the charm some weeks ago and knew who I was making it for then! The final touch was to use some wax - at long last - to stick the picture to the card.
I am really pleased with this card because it came together without any mishaps and the colours go so well.
Finally, I seem to be getting my head above water with the craft scene of late. I made a dozen general Xmas cards yesterday so can concentrate on the 'special' ones again before tackling Sheila's chunky book pages once more. All this and the 12 days of Christmas will be here before we know it. My dilemma is whether to have a go again this year!!!......
Saturday, 13 November 2010
MOVING AND A SHAKIN'
What a jolly theme from Heather this month, Movers and Shakers.
It could be translated any way you wanted, be it a dangling charm, a shaker ATC, a tag, etc.. It just reminded me of dancing about having a good old shake, rattle and roll. So, I decided to make a line of burlesque girls - don't ask me why, I think it was the idea of using beads to make some legs!!!! Anyway - drum roll - here come the girls...........


aren't they gorgeous?? Notice their shoes? Painstakingly made by 'peg leg'.

You just want to dance now don't you?
 Ok, so I've lost the plot. I'd better get back to those Christmas cards I think.
It could be translated any way you wanted, be it a dangling charm, a shaker ATC, a tag, etc.. It just reminded me of dancing about having a good old shake, rattle and roll. So, I decided to make a line of burlesque girls - don't ask me why, I think it was the idea of using beads to make some legs!!!! Anyway - drum roll - here come the girls...........


aren't they gorgeous?? Notice their shoes? Painstakingly made by 'peg leg'.

You just want to dance now don't you?

Thursday, 11 November 2010
SANTA SAYS.........
Another Crimbo card completed.
 I just love this size of card - 7.5" sq. - there's so much space to put die cut shapes without them looking cluttered.
The base paper is from Tim's vintage shabby stack, simply roughed at the edges and distressed with fired brick. The lovely Santa image is a freebie download, again roughed and distressed. I had a little bit of music paper which I stuck to some rather thick card before running it through my Big Shot with Tim's reindeer flight die. I managed to cut out 3 complete reindeer and 2 incomplete, 1 of which is hidden on this card and the others are ready for another project. I threaded little bells on ribbon - what a job that was!! - and fastened them around their neck. I embossed Tim's flourish with - get this - red cinnamon scented powder, It really smells too. Once everything was distressed I simply stuck it all in place.
This was fun but I'm leaving the Xmas cards alone for a little while because I really must make my 3 ATCs for Heather's swap which this month is Movers and Shakers.
Wednesday, 10 November 2010
I KNOW FOR A FACT IT'S NOT WOYWW TIME
In my understanding, WOYWW translates into What's on Your Worksdesk Wednesday.
Having had a really good look at my year planner, Wednesday is supposed to be the 10th November this week, am I correct? That makes last Friday the 5th - bonfire night - yes? Well, as fireworks went off round here on Friday, Saturday and Sunday, that would make Monday the 6th, Tuesday the 7th and Wednesday the 8th. So, is it really Wednesday or just Monday??????? or have I actually found the reason why these woyww's come round so quickly!!
Having completely smudged my brain - which isn't hard! - I took some photos whilst the light permitted.

Ok, this isn't my little work space, it's the dining table, or to give it it's true description, 'peg leg's' computer space - see it on the left! - where I set up my Copics ready to colour a stamped Magnolia image. Can't believe it, but the sun was shining!

This is some of the mess in my room. I wanted to make a black, white and red Xmas card so I had a rummage through my 'posh' paper drawer and found some Magenta papers and the gorgeous embossed one you see in the picture.
I'd seen some card samples where round punched backings were used and really liked the effect. However, I don't have any punches that would create a circle punched design, so I bought a really cheap bag of doilies. Cost 79p!!!!! for 45 in 3 sizes - total bargain.
 I also went on the search for some - get this - white, spirally, flower-like, spiky things to go on my 'cute' Xmas cards. Not a chance, been everywhere. Thought - make some. I have some white flower soft, wire, glue, glitter etc., so set to and made 3. One was complete rubbish, but the other 2 weren't bad. I used them on the finished card.

Can you see them on the right?
I edged the doilies with some fired brick DI to take the creaminess off 'cos I wanted to maintain white. The card is another given to me by Sonia last week - goodness, last week already - and is about 7.5" sq. The wire bead on the left is miles long in it's packet and only cost £1.50! What a bargain eh?
Well, the cute is over for a while, I'm making grungy now before the boring stuff of matting and layering toppers for multi output.
I tried hard to get round as many of you as I could last week, but time was so against me. I'll do my best again this week. On a little personal note, 'peg leg' has a date of 23rd Nov for his knee operation. Just hope his blood pressure has gone down enough by then.
Having had a really good look at my year planner, Wednesday is supposed to be the 10th November this week, am I correct? That makes last Friday the 5th - bonfire night - yes? Well, as fireworks went off round here on Friday, Saturday and Sunday, that would make Monday the 6th, Tuesday the 7th and Wednesday the 8th. So, is it really Wednesday or just Monday??????? or have I actually found the reason why these woyww's come round so quickly!!
Having completely smudged my brain - which isn't hard! - I took some photos whilst the light permitted.

Ok, this isn't my little work space, it's the dining table, or to give it it's true description, 'peg leg's' computer space - see it on the left! - where I set up my Copics ready to colour a stamped Magnolia image. Can't believe it, but the sun was shining!

This is some of the mess in my room. I wanted to make a black, white and red Xmas card so I had a rummage through my 'posh' paper drawer and found some Magenta papers and the gorgeous embossed one you see in the picture.
I'd seen some card samples where round punched backings were used and really liked the effect. However, I don't have any punches that would create a circle punched design, so I bought a really cheap bag of doilies. Cost 79p!!!!! for 45 in 3 sizes - total bargain.


Can you see them on the right?
I edged the doilies with some fired brick DI to take the creaminess off 'cos I wanted to maintain white. The card is another given to me by Sonia last week - goodness, last week already - and is about 7.5" sq. The wire bead on the left is miles long in it's packet and only cost £1.50! What a bargain eh?
Well, the cute is over for a while, I'm making grungy now before the boring stuff of matting and layering toppers for multi output.
I tried hard to get round as many of you as I could last week, but time was so against me. I'll do my best again this week. On a little personal note, 'peg leg' has a date of 23rd Nov for his knee operation. Just hope his blood pressure has gone down enough by then.
Monday, 8 November 2010
WHAT A TERRIBLE STORM
I so hope you are all ok after last night's terrible storm. I understand that the south of the country may still have it to come so please take great care.
I don't think I slept a wink as the noise of the wind and driving rain was just frightening. However, we don't appear to have any damage although we haven't checked my car and the motorhome yet. 'Peg leg' moved the camper from under some big trees last night, so it should be fine. Luckily, the only mishap seems to have been a chunk of wood landing in the big pond. Thank goodness that's what happened because my greenhouse is only feet away!!
 Batten down the hatches and stay safe. x
I don't think I slept a wink as the noise of the wind and driving rain was just frightening. However, we don't appear to have any damage although we haven't checked my car and the motorhome yet. 'Peg leg' moved the camper from under some big trees last night, so it should be fine. Luckily, the only mishap seems to have been a chunk of wood landing in the big pond. Thank goodness that's what happened because my greenhouse is only feet away!!

Saturday, 6 November 2010
SCD NOVEMBER CHALLENGE WEEK 1 - HOUSES
Pop over to the Something Completely Different challenge blog for details of this weeks challenge.
The theme is houses.
A good chance to use my new Tim Holtz on the edge townscape die. I tried it with mount board but it didn't cut through properly. The die is quite intricate, just like the scrollwork one, and that doesn't really like mount board either - but I make it have it!!!
 In the end I cut the houses out of grunge paper.
This photo shows the sparkle in the stickles.
 This one shows the reflection of light in the windows of the houses.
I used paint dabbers to colour each house and gesso for snow on the rooves and the 'ground' plus some glitter. I already had some off cuts of mirri card that I had previously coloured with Stazon, so used little pieces to stick behind the houses. The light shines on them and makes it look like lights are on in each one.
The base card is distressed over a clear embossed Santa which I ironed to get rid of the embossing. The stars are embossed with sparkly white powder and the 'ho, ho, ho' is simply stamped with Brilliance white.
It didn't turn out as effectively as I wanted, but in real life, it's not too bad.
The theme is houses.
A good chance to use my new Tim Holtz on the edge townscape die. I tried it with mount board but it didn't cut through properly. The die is quite intricate, just like the scrollwork one, and that doesn't really like mount board either - but I make it have it!!!

This photo shows the sparkle in the stickles.

I used paint dabbers to colour each house and gesso for snow on the rooves and the 'ground' plus some glitter. I already had some off cuts of mirri card that I had previously coloured with Stazon, so used little pieces to stick behind the houses. The light shines on them and makes it look like lights are on in each one.
The base card is distressed over a clear embossed Santa which I ironed to get rid of the embossing. The stars are embossed with sparkly white powder and the 'ho, ho, ho' is simply stamped with Brilliance white.
It didn't turn out as effectively as I wanted, but in real life, it's not too bad.
BRRRR!
Winter is definitely in the air, more so next week aparently. I am trying to make a few Christmas cards, the special ones at least. The image on this one is really chilly, to match the temperature.
 I coloured this a while ago so only had to add bit of bling ie. stickles to her fur trim.
The base card is HUGE. It's 7.5" square and is from a pack that Sonia kindly gave me last Tuesday. Thanks again Sonia. I covered the front with a piece of Tim's Vintage Shabby paper, a piece of gorgeous lilac paper which is silver embossed. I've not been able to cut into this paper because it's so gorgeous, but hey! the time has come.
I matted the image onto another piece of Tim's paper, roughed the edges and stuck that to the card. All the paper was distressed around the edges with dusty concord and the image was edged with silver stickles, bits of silver peel off to make corners and some square sticky gems. I made the snowflake ribbon with a Martha Stewart punch and the white branch is from Tim's regal crest die. Everything else is from my stash.
I enjoyed this one, but reckon it may have to have a box if it gets posted.
I've started another card but want to enter it into a challenge so I must get on with it as I have to make 2 birthday cards and one of those is needed for next Tuesday!!
Friday, 5 November 2010
FRIGHTENING ATCs!!!!!
Well they aren't really frightening, but the theme of Heather's challenge last month was 'things that go bump in the night'. My 3 swapped cards were waiting for me yesterday when I got back from our little trip.

Now, fancy Heather sending me 2 with pusscats on - thanks for the choice of cards, Heather, they are superb.
So, left to right,
scaredy cat by Elaine Greaves
a rather haunted looking house by Sheila King
Halloween by Mel Dunkley
I am really impressed with all these cards. The colours and textures are all appealing. Thank you ladies, and thank you Heather for the little extra. xx
Thursday, 4 November 2010
A FEW MORE PHOTOS
The weather has been just awful this week and being away means having to use my web dongle. It's really good but a bit slow especially when the motorhome is nearly being blown over and the signal keeps failing. However, none of that spoiled Sonia and my day on Tuesday. We never actually 'made' anything but we had fun with alcohol inks and I did manage to die cut some grunge and card for her.

Not got a clue what we were doing here, looks like a right old struggle. Oh! I know. I was trying to show Sonia how to make flowers. We used the large tattered floral flower so that it wouldn't be too fiddly - but it was. Anyway, at least she managed to go away with a decent example from which to make some more.
This looks like 'peg leg' didn't want to get involved so took a photo from the front seat.

I think I am cutting up some glossy card ready to ink. Sonia is taking in the chatter about which type of card stock to use for alocohol inks and distress inks. She has been using pearlised card for her DIs and found that blending worked really well on it. I tried to explain about the different effects with different card and suggested she try the Personal Impressions 300gsm card that Lindsay uses.

Here are some of the little samples we made. I am lucky enough to have all the alcohol inks so we had a top choice. In fact, I haven't played with some of them so it was exciting for me too.
One of the best parts of the day was the fact that Sonia drove to Southport. She needed a boost to get back behind the wheel and I am glad she did. Her journey was straight forward so she was quite comfortable, and being a competent driver anyway, this little trip did the trick. Well done you.
'Til next time then.

Not got a clue what we were doing here, looks like a right old struggle. Oh! I know. I was trying to show Sonia how to make flowers. We used the large tattered floral flower so that it wouldn't be too fiddly - but it was. Anyway, at least she managed to go away with a decent example from which to make some more.

This looks like 'peg leg' didn't want to get involved so took a photo from the front seat.

I think I am cutting up some glossy card ready to ink. Sonia is taking in the chatter about which type of card stock to use for alocohol inks and distress inks. She has been using pearlised card for her DIs and found that blending worked really well on it. I tried to explain about the different effects with different card and suggested she try the Personal Impressions 300gsm card that Lindsay uses.

Here are some of the little samples we made. I am lucky enough to have all the alcohol inks so we had a top choice. In fact, I haven't played with some of them so it was exciting for me too.
One of the best parts of the day was the fact that Sonia drove to Southport. She needed a boost to get back behind the wheel and I am glad she did. Her journey was straight forward so she was quite comfortable, and being a competent driver anyway, this little trip did the trick. Well done you.
'Til next time then.
LINDSAY MASON BLOG CANDY
Check out Lindsay's blog for details of a candy giveaway. Here's the link
.http://lindsaymason.blogspot.com/2010/11/blog-candy.html
Simply leave a comment between now and the 14th November and you could win, not only some of Lindsay's lovely stamps and papers, but also an original piece of artwork.
.http://lindsaymason.blogspot.com/2010/11/blog-candy.html
Simply leave a comment between now and the 14th November and you could win, not only some of Lindsay's lovely stamps and papers, but also an original piece of artwork.
Wednesday, 3 November 2010
WOYWW - BUT TUESDAY PHOTOS
Awful weather today but that didn't stop my pal Sonia from driving to Southport, where we are in the motorhome, for a day of craft. As you can gather from that statement, these photos of my workdesk have been taken Tuesday, not Wednesday. Sorry Julia.
 Sonia wanted to have a go at playing with alcohol inks, so that's mainly what we did. We dabbed, swooshed, dragged and dappled with many of the colours so that she could have examples of the many techniques surrounding this amazing product.
 All in all we had a really super day despite the absolutely terrible weather.


Subscribe to:
Posts (Atom)