Well now Julia, wonderful leader of the weekly desk snoop, I have a little surprise for you this morning. Known generally for having a tidy desk, look at it now:
It's completely cluttered and I can't move.
I've been busy decorating papier mache boxes, making a little gift card wallet courtesy of Hels tutorial, making my DT ATCs and challenge entries and generally having to do more work on the computer than when I actually went to work!!!
I now have another Xmas project which is just visible in the photo above. A red tree inside a box. It's going to be a little Xmas scene and will replace a card for my hairdresser who now expects something exciting each year. I made her a star card some years ago and she still brings it out each Xmas. Warms your heart to know you made something that bring pleasure like that. Whilst using some distress stains though, I now find that the dusty concorde one is now a lovely green colour. I've already had 4 bottles replaced by Ranger and now it looks like I will have to contact them again after I've gone through every one this time that is. Just ordered the 12 new ones so I hope they will be ok.
Well today should have seen my little car have it's MOT, but last night the rear n/s wheel ceased up so we had to cancel it. I need to get it done because I don't know whether this will be the decision time for it to carry on or be scrapped. It's now 15yrs old but still lovable. Just hope that my DH can get it done within the week so I know whether to cash in the tax disc, renew my insurance or whether to just sit and cry.......
Ok, see you next week.
Showing posts with label distress stains. Show all posts
Wednesday, 21 November 2012
Wednesday, 7 November 2012
WOYWW #179
I'm up a bit earlier this week in practice for a very early start tomorrow in order to travel down the horrid M6 to the NEC show. I wonder whether our leader of the Wednesday desk hop, Julia will be there or any of you fellow woywwers. If so, give us a wave.
I've actually been crafting my little heart out this week although some of my work has been on the computer and to do with my DT slot. However, I've made Tim's tag, a couple of ATCs and am now working on a birthday card which I hope to finish today. So this is the state of my desk:
Obviously taken last night but it is still the same this morning except for the banana. I ate that! Lots of distress stains and ink pads together with a few leaves, die cut from the Autumn strip die. The rest is probably the same as always.
Right then, I'm off to start my travels and hopefully leave a few comments, that's if Blogger doesn't play up like it has for the past 2 days making my life so difficult.
I've actually been crafting my little heart out this week although some of my work has been on the computer and to do with my DT slot. However, I've made Tim's tag, a couple of ATCs and am now working on a birthday card which I hope to finish today. So this is the state of my desk:
Obviously taken last night but it is still the same this morning except for the banana. I ate that! Lots of distress stains and ink pads together with a few leaves, die cut from the Autumn strip die. The rest is probably the same as always.
Right then, I'm off to start my travels and hopefully leave a few comments, that's if Blogger doesn't play up like it has for the past 2 days making my life so difficult.
Monday, 5 November 2012
12 TAGS OF 2012 - NOVEMBER
Another wonderful tag from Tim for this month. I adore the Autumn colours although not the season. I much prefer it when everything is springing into life rather than going to sleep because the awful cold is coming.
I had all the distress inks and stains plus the strip die, but that was it really, so another compromise which I think has worked really well.
I think the squirrel has his eye on that acorn but he had better wait a while because the glossy accents aren't quite dry!!
The leaf stamp is from Tim's Falling Leaf collection, the word is a Hero Arts stamp, the chicken wire stamp is from The Artistic Stamper and the gingham stamp is from Wendy Vecchi.
Another fun project which has given me a great idea for a birthday card I have to go and make now for an elderly male neighbour. Thanks Tim.
I had all the distress inks and stains plus the strip die, but that was it really, so another compromise which I think has worked really well.
I think the squirrel has his eye on that acorn but he had better wait a while because the glossy accents aren't quite dry!!
The leaf stamp is from Tim's Falling Leaf collection, the word is a Hero Arts stamp, the chicken wire stamp is from The Artistic Stamper and the gingham stamp is from Wendy Vecchi.
Another fun project which has given me a great idea for a birthday card I have to go and make now for an elderly male neighbour. Thanks Tim.
Wednesday, 5 September 2012
WOYWW #170
A bright and sunny morning to all woyww-ers around the world especially our lovely leader Julia who by now will be off doing other things after having posted a photo of her desk earlier.
I haven't done very much crafting of late because there are so many jobs to do around the house before the onset of winter. Oh! listen to me, as if we had a summer!!!!! Anyway, here is the usual bit of my desk:
Nothing new there except my DT book, my partly finished Tim 2012 September tag - I don't have the typewriter die so am pondering what to add instead - a tiny piece of crinkle ribbon on top of a bit of metal sheet, a pan scrub that I used on the tag as I don't have any nasty wire wool and a tiny perfume bottle.
The rest of my desk looks like this:
Empty apart from a part eaten bag of chocolate peanuts, some indigestion tablets, the piece of card I used to mark my green' should be brown' distress markers (now replaced by Ranger - thank you so much for such an amazingly quick service), an external hard drive and my wonderful glasses case and drinks mat.
So no crafty project in the making. Goodness knows when I shall be able to start something. We still have the shed fascia boards to replace, the greenhouse to re-coat (it's wooden) some cementing to do, a paving slab to lift and straighten as tree roots have raised it, plus ordinary life which keeps getting in the way. Hope we finish everything before our next set of booked dates which begin in 2/3 weeks. Righto, off to start again.
I haven't done very much crafting of late because there are so many jobs to do around the house before the onset of winter. Oh! listen to me, as if we had a summer!!!!! Anyway, here is the usual bit of my desk:
Nothing new there except my DT book, my partly finished Tim 2012 September tag - I don't have the typewriter die so am pondering what to add instead - a tiny piece of crinkle ribbon on top of a bit of metal sheet, a pan scrub that I used on the tag as I don't have any nasty wire wool and a tiny perfume bottle.
The rest of my desk looks like this:
Empty apart from a part eaten bag of chocolate peanuts, some indigestion tablets, the piece of card I used to mark my green' should be brown' distress markers (now replaced by Ranger - thank you so much for such an amazingly quick service), an external hard drive and my wonderful glasses case and drinks mat.
So no crafty project in the making. Goodness knows when I shall be able to start something. We still have the shed fascia boards to replace, the greenhouse to re-coat (it's wooden) some cementing to do, a paving slab to lift and straighten as tree roots have raised it, plus ordinary life which keeps getting in the way. Hope we finish everything before our next set of booked dates which begin in 2/3 weeks. Righto, off to start again.
Sunday, 26 August 2012
METALLIC STAINS
My set of the new metallic distress stains arrived yesterday.
I underdstand that their use is the same as picket fence. Not really too sure as yet so there's only one way to find out.
Friday, 11 May 2012
ATCs/CARDS WITH ATTITUDE #13 - BUTTERFLIES AND BLOOMS
This fortnight I chose an image from fresh Brewed Designs - Steamy Romance.
I ran an A6 sized piece of Lost and Found paper through my printer after I had re-sized the digi image to fit an ATC. I then cut the paper to it's final size before colouring over it all with a few different distress stains. The red and green colouring were done with studio acrylic paint and the white of the mug was achieved with picket fence distress stain. A covering of glossy accents on the hearts and a Prima leaf finished it all off.
Pop over to our blog HERE for some fabulous samples from our Design Team, some of which have only joined us this week. They have done so well. Remember, you can make a card if you don't like ATCs and if the theme of this fortnight's challenge doesn't appeal either, just make something with an anything goes theme.
I ran an A6 sized piece of Lost and Found paper through my printer after I had re-sized the digi image to fit an ATC. I then cut the paper to it's final size before colouring over it all with a few different distress stains. The red and green colouring were done with studio acrylic paint and the white of the mug was achieved with picket fence distress stain. A covering of glossy accents on the hearts and a Prima leaf finished it all off.
Pop over to our blog HERE for some fabulous samples from our Design Team, some of which have only joined us this week. They have done so well. Remember, you can make a card if you don't like ATCs and if the theme of this fortnight's challenge doesn't appeal either, just make something with an anything goes theme.
Wednesday, 25 April 2012
WICKED WEDNESDAY ATC - #29 - YOU ARE MY SUNSHINE
We could certainly do with some sunshine in the UK today. Storms have caused havoc in the south and are now venturing north to me. At least the lovely cards that the Wicked Wednesday ATC DT have made bring a smile and warmth to your soul.
I decided to heat up my melt pot and make a face for my sun. Here it is:
I used alcohol inks for the base card giving the effect of a lovely blue sky. The rays are stamped in saffron Archival ink. I coloured the ruff with mustard seed distress stain and stuck everything down with multi matt medium including the defintion which I cut from an old dictionary.
Right then, next task........
I decided to heat up my melt pot and make a face for my sun. Here it is:
I used alcohol inks for the base card giving the effect of a lovely blue sky. The rays are stamped in saffron Archival ink. I coloured the ruff with mustard seed distress stain and stuck everything down with multi matt medium including the defintion which I cut from an old dictionary.
Right then, next task........
Saturday, 3 March 2012
WICKED WEDNESDAY ATCs # 21 - CELEBRATE ART
I made a mini canvas this week for the Wicked Wednesday challenge. However, as it only measured 3" x 2.5" I extended the letters to gain the extra .5" on the height.
I coloured the canvas with distress stains before stamping over it with the Mona Lisa stamp. The little portion under the fragment was coloured with distress markers before sticking the fragment down with glossy accents. The letters are grungeboard painted with a black dabber and edged in gold.
I hope that one of the most famous paintings in the world is a suitable subject this week.
I coloured the canvas with distress stains before stamping over it with the Mona Lisa stamp. The little portion under the fragment was coloured with distress markers before sticking the fragment down with glossy accents. The letters are grungeboard painted with a black dabber and edged in gold.
I hope that one of the most famous paintings in the world is a suitable subject this week.
Saturday, 11 February 2012
WICKED WEDNESDAY ATCS #18 - LOVE/HEARTS OR VALENTINES DAY
I'm playing catch up today. Just one more card to make then I'm on top again. This ATC is for this week's Wicked Wednesday ATC challenge.
I thought I would use some of my stash for this one, so out came my grungeboard sheets. I started by using picket fence distress stain over a swirl stamp which I stamped on a cream base card. Over this, once dry, I blended victorian velvet, aged mahogony DIs and blended the edge with walnut stain. (Thanks Hels for today's tutorial and the reminder of this fab technique). I used gold dabber on the letters and edged those with walnut stain also. The heart is coloured with fired brick distress stain and the key with walnut stain distress stain. I stuck everything down with glossy accents including the red rose.
A simple card but I enjoyed making it and got my fingers covered in ink........well, that's all part of the fun eh?
I thought I would use some of my stash for this one, so out came my grungeboard sheets. I started by using picket fence distress stain over a swirl stamp which I stamped on a cream base card. Over this, once dry, I blended victorian velvet, aged mahogony DIs and blended the edge with walnut stain. (Thanks Hels for today's tutorial and the reminder of this fab technique). I used gold dabber on the letters and edged those with walnut stain also. The heart is coloured with fired brick distress stain and the key with walnut stain distress stain. I stuck everything down with glossy accents including the red rose.
A simple card but I enjoyed making it and got my fingers covered in ink........well, that's all part of the fun eh?
Thursday, 12 January 2012
WICKED WEDNESDAY ATCS CHALLENGE #14 - OCEAN/AQUATIC
All the deets for this super challenge are HERE.
I enjoyed this one - but then I enjoy all the challenges I have a go at - and got to use my precious Brixham shells again. Any excuse to use those because when they are all gone I will be able to make the excuse to go to Devon again for more!!!
The base is mount board covered in Terra - Sahara - which gives a sandy effect when dry smeared with a bit of broken china distress stain. I used the top of the branches from an Andy Skinner tree stamp to stamp sea weed in forest moss DI which I then clear embossed. The rest of the scene is made up of sea moss, Martha Stewart punched branches, shells, a sea horse charm, a fish button, some sparkly sticky gems and a brass anchor embossed with aged mahogony distress embossing powder. The whole effect was glued together with multi matt medium.
Thanks to Wicked Wednesday ATCs for picking me as one of their top 3 again last week. It's such fun to have a go.
I enjoyed this one - but then I enjoy all the challenges I have a go at - and got to use my precious Brixham shells again. Any excuse to use those because when they are all gone I will be able to make the excuse to go to Devon again for more!!!
The base is mount board covered in Terra - Sahara - which gives a sandy effect when dry smeared with a bit of broken china distress stain. I used the top of the branches from an Andy Skinner tree stamp to stamp sea weed in forest moss DI which I then clear embossed. The rest of the scene is made up of sea moss, Martha Stewart punched branches, shells, a sea horse charm, a fish button, some sparkly sticky gems and a brass anchor embossed with aged mahogony distress embossing powder. The whole effect was glued together with multi matt medium.
Thanks to Wicked Wednesday ATCs for picking me as one of their top 3 again last week. It's such fun to have a go.
Wednesday, 4 January 2012
GRUNGY MONDAY #31 - A BIRTHDAY CARD FOR TIM
Having won a prize from Tim this week, it would be rude not to say another thank you to him so I have joined in the Grungy Monday challenge this week.
Here is what I came up with:
I used a base card 8"x8" and covered the front with a piece of kraft resist paper which I painted with picket fence distress stain. I die cut the hanging sign from core'dinations card together with the autumn gatherings and letters from vintage market strip dies. All from Tim's core'dinations distress card. I also used his jump rings, glossy accents, DIs walnut stain, rusty hinge, peeled paint, shabby shutters, bundled sage and forest moss. I die cut some tattered leaves from shrink plastic, coloured them very lightly with DIs and shrank them in my melt pot using clear UTEE.
This was a lot of fun but quite worrying too. After all, making something for the King of Distress which is worthy was somewhat daunting. Hope it's ok.
Here is what I came up with:
I used a base card 8"x8" and covered the front with a piece of kraft resist paper which I painted with picket fence distress stain. I die cut the hanging sign from core'dinations card together with the autumn gatherings and letters from vintage market strip dies. All from Tim's core'dinations distress card. I also used his jump rings, glossy accents, DIs walnut stain, rusty hinge, peeled paint, shabby shutters, bundled sage and forest moss. I die cut some tattered leaves from shrink plastic, coloured them very lightly with DIs and shrank them in my melt pot using clear UTEE.
This was a lot of fun but quite worrying too. After all, making something for the King of Distress which is worthy was somewhat daunting. Hope it's ok.
Saturday, 26 November 2011
WICKED WEDNESDAY ATC #7 - BOOKS/READING
This week, over at the Wicked Wednesday ATC Challenge blog, the theme is books/reading.
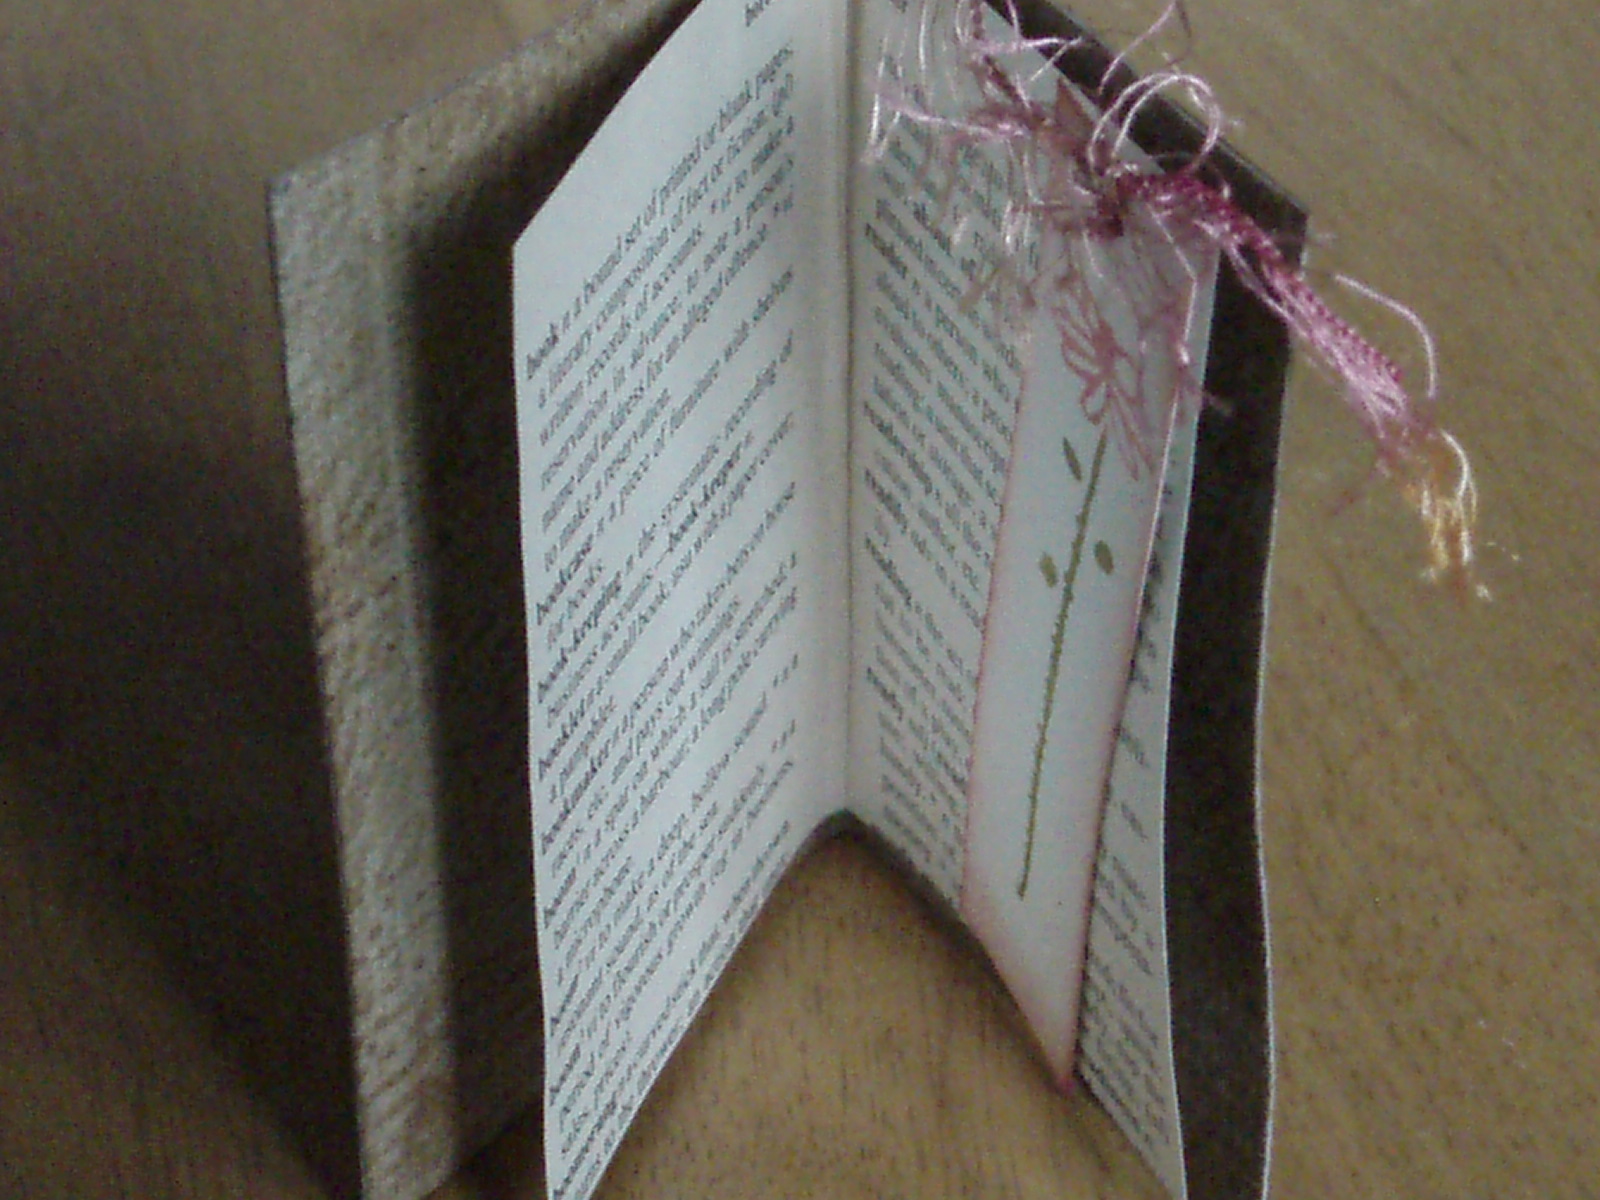
Interpret this however you want by using stamps, digis, or even torn printed pages. I decided to make a little book. It proved difficult to photograph in one go, but here it is:
I used grungepaper and put it through my Big Shot in one of Tim's embossing folders - collage - in order to give it a faux leather look. I then used Old Paper distress stain all over it followed by Vintage Photo distress ink. I stuck some dark brown ribbon along the spine, a gold peel-off in each corner and used lettraset letters on the front to call the book Wicked Atcs.
I found the words Book and Reading in an old dictionary, cut them out and made a couple of pages to fit the inside. I stuck these in with glossy accents.
Then I cut a small piece of white card, stamped it with a Hero Arts flower which I coloured with Peeled Paint and Worn Lipstick distress ink to stamp, distressed the edges with Barn Door DI and added a bit of fibre to match. Voila, a bookmark.
Just a bit of fun. But, that's what it's all about isn't it.
Interpret this however you want by using stamps, digis, or even torn printed pages. I decided to make a little book. It proved difficult to photograph in one go, but here it is:
I used grungepaper and put it through my Big Shot in one of Tim's embossing folders - collage - in order to give it a faux leather look. I then used Old Paper distress stain all over it followed by Vintage Photo distress ink. I stuck some dark brown ribbon along the spine, a gold peel-off in each corner and used lettraset letters on the front to call the book Wicked Atcs.
I found the words Book and Reading in an old dictionary, cut them out and made a couple of pages to fit the inside. I stuck these in with glossy accents.
Then I cut a small piece of white card, stamped it with a Hero Arts flower which I coloured with Peeled Paint and Worn Lipstick distress ink to stamp, distressed the edges with Barn Door DI and added a bit of fibre to match. Voila, a bookmark.
Just a bit of fun. But, that's what it's all about isn't it.
Friday, 21 October 2011
A PAPER TOWEL XMAS CARD
I've had this card laid out for about a week now but have been 'scared' to actually put it together. I wasn't sure whether it would work nor how to achieve the look I wanted. In the end I just went for it and gave up wondering.
The whole thing came about after making a gorgeous card that Andy Skinner had given instructions for. The amazing orange sky attracted me and I had just the thing I wanted to use - kitchen towels - that I had used to dry ink on both backgrounds and my work sheet. I put 3 of them together to form the sky and began.
The kitchen towel sky is on the right of the A4 card that I blended Distress Stains on to in order to make the rest of the sky. Does that make sense?
The cardstock is not really thick enough for a base card, so I generally fold another piece to A4 and place it inside.
Anyway, I then got to work stamping, cutting out and sticking in place. This is the finished card front.
In the end I was really pleased with it. I thought the inside 'stiffener' needed a little something, so added this.
I am on a roll with Xmas cards just now so if I know you and you follow my day to day ramblings, one of the cards I make and show may just pop through your letter box this year. This one knows it's destination so I hope the recipient(s) like it.
The whole thing came about after making a gorgeous card that Andy Skinner had given instructions for. The amazing orange sky attracted me and I had just the thing I wanted to use - kitchen towels - that I had used to dry ink on both backgrounds and my work sheet. I put 3 of them together to form the sky and began.
The kitchen towel sky is on the right of the A4 card that I blended Distress Stains on to in order to make the rest of the sky. Does that make sense?
The cardstock is not really thick enough for a base card, so I generally fold another piece to A4 and place it inside.
Anyway, I then got to work stamping, cutting out and sticking in place. This is the finished card front.
In the end I was really pleased with it. I thought the inside 'stiffener' needed a little something, so added this.
I am on a roll with Xmas cards just now so if I know you and you follow my day to day ramblings, one of the cards I make and show may just pop through your letter box this year. This one knows it's destination so I hope the recipient(s) like it.
Tuesday, 11 October 2011
JOURNAL JOURNEYS OCTOBER CHALLENGE
This month's challenge over at Journal Journeys is autumn/nature plus the use of stencils.
Although, unlike many, I actually don't like Autumn. I hate the thought of everything dying plus the cold, wet and wind. The dark doesn't help either. I much prefer spring when everything is happy. Having said that, I do adore the autumn colours which are some of my most favourite ever especially the deep reds.
Still not really into this journaling lark but I keep having a go, so here are my pages for the challenge this month.
I used a mixture of distress inks, colour wash and Terra to create the background and I used a flower stencil plus the remains of grungepaper once I had die cut leaves and a swirl as another set of stencils. The dots are the remnants of red rubber once I had mounted the alpha stamps it contained and I also used a plastic letter stencil to spray some perfect pearls through - which hasn't shown too well on the photo. The 'rutting' deer are from Tim Holtz reindeer flight die and their antlers are from his branch tree die. The words are one of Andy Skinner's stamps.
Although I said autumn means everything is closing down ready for the winter and dying, I think the amazing colours have brought this little scene to life.
Although, unlike many, I actually don't like Autumn. I hate the thought of everything dying plus the cold, wet and wind. The dark doesn't help either. I much prefer spring when everything is happy. Having said that, I do adore the autumn colours which are some of my most favourite ever especially the deep reds.
Still not really into this journaling lark but I keep having a go, so here are my pages for the challenge this month.
I used a mixture of distress inks, colour wash and Terra to create the background and I used a flower stencil plus the remains of grungepaper once I had die cut leaves and a swirl as another set of stencils. The dots are the remnants of red rubber once I had mounted the alpha stamps it contained and I also used a plastic letter stencil to spray some perfect pearls through - which hasn't shown too well on the photo. The 'rutting' deer are from Tim Holtz reindeer flight die and their antlers are from his branch tree die. The words are one of Andy Skinner's stamps.
Although I said autumn means everything is closing down ready for the winter and dying, I think the amazing colours have brought this little scene to life.
Wednesday, 15 June 2011
WOYWW - IT'S JUNE BUT NOT SUMMER!!!
Yesterday was gorgeous though, but having looked at the forecast for the coming days, we are in for rain - again!
Off down the dreaded M6 this morning to Weston Park near Telford for the model flying show that 'T' (note the new name as his knee is fine now) loves to go to each year. It's where I fell out of the motorhome last year hurting my leg. It still hurts if touched and I have a dent where I bashed it. Hope all goes well this time.
I will be painting the front room when we get back and proudly displaying new curtains, rug, cushions etc.. I have some cheap pictures (if you can call them that) on the wall - well they are cheap it's whether they can pass as pictures that's the issue. They won't match the new colour scheme so I am taking them with me along with acrylic paint, distress inks and stains, stamps, plus a few other bits, and will be trying to alter them.
So my workspace is showing the stash ready for packing.
I hope to be able to link with our wonderful leader Julia's post before we set off. I have tried to comment on several posts for a few weeks now, but Blogger will not let me. Therefore, please accept my apologies if I have not been able to contact you. I have had some advise on what to do but haven't had the chance as yet. I will however, try harder when we return.
Enjoy your trip around the world today, much better than the M6 south!!!!!!
Off down the dreaded M6 this morning to Weston Park near Telford for the model flying show that 'T' (note the new name as his knee is fine now) loves to go to each year. It's where I fell out of the motorhome last year hurting my leg. It still hurts if touched and I have a dent where I bashed it. Hope all goes well this time.
I will be painting the front room when we get back and proudly displaying new curtains, rug, cushions etc.. I have some cheap pictures (if you can call them that) on the wall - well they are cheap it's whether they can pass as pictures that's the issue. They won't match the new colour scheme so I am taking them with me along with acrylic paint, distress inks and stains, stamps, plus a few other bits, and will be trying to alter them.
So my workspace is showing the stash ready for packing.
I hope to be able to link with our wonderful leader Julia's post before we set off. I have tried to comment on several posts for a few weeks now, but Blogger will not let me. Therefore, please accept my apologies if I have not been able to contact you. I have had some advise on what to do but haven't had the chance as yet. I will however, try harder when we return.
Enjoy your trip around the world today, much better than the M6 south!!!!!!
Monday, 16 May 2011
WHERE DO I START WITH THIS POST???
I needed some fun so last week I managed to book onto Amy and Lindsay's first joint workshop venture. A dose of crafting bliss enhanced by cuddles from friends just cannot be beaten.
First up for the morning session was Amy. Now I know Amy does 'simple' cards but I learnt something new from each of the 4 projects and to me just proves that there is nothing 'simple' so to speak about any card crafting. The ones we made are really gorgeous and I shall certainly be taking the techniques forward many times over. Also, I started my day by making mistakes on the first 2 cards!!!!! See I told you crafting isn't simple - just me!! - sorry David, again!
Here goes then with my fabby day. Card #1.
How could I get this wrong? Well, the patterned paper on the left should have the zig zag side the other way round so that the edge shows up on the pale green paper on the right. Lindsay to my rescue. She suggested I punch a Martha Stewart border to go over the plain edge. Looks good now eh?
2nd card.
Oh I loved this one. I carefully cut into the punched flowers so they would bend upwards, and carefully glued them together. No problems with this card - so I thought. I stuck the patterned paper to the base card and it wasn't straight. Looked awful too. Not to worry, Lindsay to the rescue who suggested a thin strip of the base card over the edge of the wonky paper which I could then stamp with the dots. Turned out just perfect in the end.
#3.
Now what could I do wrong with this card? Hehe got ya, nothing, 'cos I got this one right. This card was a little cracker to make and I love it - getting it right helped - as it uses up all those little strips of paper you get after trimming bigger bits. You just cut them to size, stick a brad through the middle of them and fan them out. This is a super card and I'll be using this tip again too.
#4.
Yes folk, we grew some carnations, or is it a peony? Whatever flower it is, it's gorgeous. We had squares of tissue paper (lots) which we then folded - concertina. We then tied a piece of ribbon round the middle to hold it in place. After that, we bent the strip in half and cut the ends to look like the top of one of Tim's tags. Holding the bit with the ribbon, we then proceeded to fold down each layer ending up with a bunch of magnificent flowers. What beautiful embellishments for parcels.
Fantastic morning. THANK YOU AMY.
After a lunch break the room was set up for Lindsay's workshop.
Card #1.
This is just a beautiful card. I still have to fasten a pearl drop to the end of the fragment. So many techniques to this A5 card, each one easy but so complicated looking. We used distress stains, acrylic dabber, distress inks, perfect pearls mists, Tim's new crowded attic paper plus a fragment. I concentrated really hard with this card, wanting to make a masterpiece. We had to stick the 'stained' paper to the front of the base card and trim it to size. I did it perfectly. Then we stuck the matted piece to the main card - Oh ***^+""**, mine was upside down. I could have cried. I had turned my card whilst cutting the paper to size and not checked it was the right way round for the next step. Lindsay to the rescue. She gave me another A5 card and suggested I cut the front off the one I had done and stick it to the new card. It didn't matter that the words were upside down. Now I look at it again, some words are sideways anyway. Phew!
Card #2.
This card brought whoops of joy from me because I had seen this one on Lindsay's blog and was mesmerized by it. The background is made with alcohol inks so you know that each one you make will be different. I love them. We stamped the fantastic tree, grasses and birds with Archival black and matted it all with black and white card onto an 8" card - my absolute favourite size. Now you will be looking at this masterpiece and thinking - the girl did good there - but actually, I had stamped my tree in mid air!!! der! David to the rescue - just by his presence - and I covered the base of the trunk with the grasses. Oh dear, what a shambles.
#3.
Now this being the last card of the day just had to go well. I'm pleased to say that my gremlins finally left me at this point and the whole card went without a hitch. We got to use one of the new Martha Stewart all over the page punches - butterfly. Again, lots of techniques but I managed them.
THANK YOU LINDSAY.
I now have a set of gorgeous cards, each with techniques new to me, all of which I shall use over and over. As for the gremlin, he's had a good kicking and been told not to bother me again. Thing is, I can't do craft in a rush, I need to take my own time, plus I'm a night person and it takes me all day to wake up. Well those are my excuses, actually, I was doing it deliberately to test Lindsay's skills at confirming that any crafting mistake can be turned around into a crafting technique!! Like that excuse better.
First up for the morning session was Amy. Now I know Amy does 'simple' cards but I learnt something new from each of the 4 projects and to me just proves that there is nothing 'simple' so to speak about any card crafting. The ones we made are really gorgeous and I shall certainly be taking the techniques forward many times over. Also, I started my day by making mistakes on the first 2 cards!!!!! See I told you crafting isn't simple - just me!! - sorry David, again!
Here goes then with my fabby day. Card #1.
How could I get this wrong? Well, the patterned paper on the left should have the zig zag side the other way round so that the edge shows up on the pale green paper on the right. Lindsay to my rescue. She suggested I punch a Martha Stewart border to go over the plain edge. Looks good now eh?
2nd card.
Oh I loved this one. I carefully cut into the punched flowers so they would bend upwards, and carefully glued them together. No problems with this card - so I thought. I stuck the patterned paper to the base card and it wasn't straight. Looked awful too. Not to worry, Lindsay to the rescue who suggested a thin strip of the base card over the edge of the wonky paper which I could then stamp with the dots. Turned out just perfect in the end.
#3.
Now what could I do wrong with this card? Hehe got ya, nothing, 'cos I got this one right. This card was a little cracker to make and I love it - getting it right helped - as it uses up all those little strips of paper you get after trimming bigger bits. You just cut them to size, stick a brad through the middle of them and fan them out. This is a super card and I'll be using this tip again too.
#4.
Yes folk, we grew some carnations, or is it a peony? Whatever flower it is, it's gorgeous. We had squares of tissue paper (lots) which we then folded - concertina. We then tied a piece of ribbon round the middle to hold it in place. After that, we bent the strip in half and cut the ends to look like the top of one of Tim's tags. Holding the bit with the ribbon, we then proceeded to fold down each layer ending up with a bunch of magnificent flowers. What beautiful embellishments for parcels.
Fantastic morning. THANK YOU AMY.
After a lunch break the room was set up for Lindsay's workshop.
Card #1.
This is just a beautiful card. I still have to fasten a pearl drop to the end of the fragment. So many techniques to this A5 card, each one easy but so complicated looking. We used distress stains, acrylic dabber, distress inks, perfect pearls mists, Tim's new crowded attic paper plus a fragment. I concentrated really hard with this card, wanting to make a masterpiece. We had to stick the 'stained' paper to the front of the base card and trim it to size. I did it perfectly. Then we stuck the matted piece to the main card - Oh ***^+""**, mine was upside down. I could have cried. I had turned my card whilst cutting the paper to size and not checked it was the right way round for the next step. Lindsay to the rescue. She gave me another A5 card and suggested I cut the front off the one I had done and stick it to the new card. It didn't matter that the words were upside down. Now I look at it again, some words are sideways anyway. Phew!
Card #2.
This card brought whoops of joy from me because I had seen this one on Lindsay's blog and was mesmerized by it. The background is made with alcohol inks so you know that each one you make will be different. I love them. We stamped the fantastic tree, grasses and birds with Archival black and matted it all with black and white card onto an 8" card - my absolute favourite size. Now you will be looking at this masterpiece and thinking - the girl did good there - but actually, I had stamped my tree in mid air!!! der! David to the rescue - just by his presence - and I covered the base of the trunk with the grasses. Oh dear, what a shambles.
#3.
Now this being the last card of the day just had to go well. I'm pleased to say that my gremlins finally left me at this point and the whole card went without a hitch. We got to use one of the new Martha Stewart all over the page punches - butterfly. Again, lots of techniques but I managed them.
THANK YOU LINDSAY.
I now have a set of gorgeous cards, each with techniques new to me, all of which I shall use over and over. As for the gremlin, he's had a good kicking and been told not to bother me again. Thing is, I can't do craft in a rush, I need to take my own time, plus I'm a night person and it takes me all day to wake up. Well those are my excuses, actually, I was doing it deliberately to test Lindsay's skills at confirming that any crafting mistake can be turned around into a crafting technique!! Like that excuse better.
Wednesday, 27 April 2011
WOYWW #99
It's that Wednesday again. You know, the day that comes around quicker than any of the others in the week. It's also the one that turns us into snoopers and encourages us to sneak into fellow crafter's rooms and have a nosey in their cupboards, on their desks and admire their craft tools and wips.. Want to join us? then pop over to our leader, Julia, for all the info.
Mine is like this today -
Not a lot different from last week or any other come to that. I'm one that just has to clear away each time I use something so that I have room to work and also so I know where to find that something the next time I need it. One reason I can always put my fingers on my 45yr old Fiskars scissors you see in this photo.
In between other things over this past week, I have actually made another page for Toby's album. I'm ahead of myself with this one because it's for his birthday on the 24th May which is when I'll blog it. It turned out nice but should have had the photo you see on the shelf in it too, however, I decided to use an on the edge die from Tim's range and ended up cutting the photo in half!!!! I was destraught as I hate cutting his photos. I played around with some Claudine Helmuth paints and distress stains yesterday to make backings for ATCs. This is how they turned out.
I like them very much. No idea what I will add to them but they are for my stash so only time will tell. The idea was launched this week by Hels, you know the lass who is whizzing off to Ranger U tomorrow! She did a bit of splodging and splashing of paint and ink and the idea appealed so I had a go too. My mind boggles at the thought of what she will get up to when she comes back and what fabulous creations will be aired. I can't wait and wish her an amazing trip. Keep us informed of everything along the way Hels. xx
Well today is going to be busy. We are replacing the fascia boards with plastic today in readiness for having the outside walls re-rendered next week with a polymer resin material which will be covered with ----- crushed sea shells. Well I do live near the sea! Actually it's an insulation product discovered by a firm called Testa Teres which should give a 50%+ reduction in heat loss.
But how can your 'peg leg' be doing that today after having a double hernia operation yesterday, I hear you asking. True to form, the NHS decided to ignore him by not sending a letter or phoning him with details to go in for the op. So much for having a date. We are now back to waiting and wondering what is going on. On the up side though, the motorhome passed it's MOT (2nd time of trying) after having to have a new stainless steel exhaust made because you CANNOT buy a replacement one for our van. Just another little problem of late.
Thanks for reading this far - if you have - I had better get dressed and go climb a ladder I suppose.
Mine is like this today -
Not a lot different from last week or any other come to that. I'm one that just has to clear away each time I use something so that I have room to work and also so I know where to find that something the next time I need it. One reason I can always put my fingers on my 45yr old Fiskars scissors you see in this photo.
In between other things over this past week, I have actually made another page for Toby's album. I'm ahead of myself with this one because it's for his birthday on the 24th May which is when I'll blog it. It turned out nice but should have had the photo you see on the shelf in it too, however, I decided to use an on the edge die from Tim's range and ended up cutting the photo in half!!!! I was destraught as I hate cutting his photos. I played around with some Claudine Helmuth paints and distress stains yesterday to make backings for ATCs. This is how they turned out.
I like them very much. No idea what I will add to them but they are for my stash so only time will tell. The idea was launched this week by Hels, you know the lass who is whizzing off to Ranger U tomorrow! She did a bit of splodging and splashing of paint and ink and the idea appealed so I had a go too. My mind boggles at the thought of what she will get up to when she comes back and what fabulous creations will be aired. I can't wait and wish her an amazing trip. Keep us informed of everything along the way Hels. xx
Well today is going to be busy. We are replacing the fascia boards with plastic today in readiness for having the outside walls re-rendered next week with a polymer resin material which will be covered with ----- crushed sea shells. Well I do live near the sea! Actually it's an insulation product discovered by a firm called Testa Teres which should give a 50%+ reduction in heat loss.
But how can your 'peg leg' be doing that today after having a double hernia operation yesterday, I hear you asking. True to form, the NHS decided to ignore him by not sending a letter or phoning him with details to go in for the op. So much for having a date. We are now back to waiting and wondering what is going on. On the up side though, the motorhome passed it's MOT (2nd time of trying) after having to have a new stainless steel exhaust made because you CANNOT buy a replacement one for our van. Just another little problem of late.
Thanks for reading this far - if you have - I had better get dressed and go climb a ladder I suppose.
Tuesday, 12 April 2011
AND THE WINNER IS...............
ME.
I just won a set of the new flower stamps from the Artistic Stamper. Yippeeee.
Jennie is so excited to have reached 700 followers, that she is offering another blog candy - see the right side bar for details.
This one runs 'til 21 April and only requires you to leave a comment on her blog and be a follower. The candy is
3 new background stamps
the tag in the picture
3 random colours of Tim Holtz distress stains
I reckon that's a good prize and well worth the 'no effort' required to have a go. I have.
I just won a set of the new flower stamps from the Artistic Stamper. Yippeeee.
Jennie is so excited to have reached 700 followers, that she is offering another blog candy - see the right side bar for details.
This one runs 'til 21 April and only requires you to leave a comment on her blog and be a follower. The candy is
3 new background stamps
the tag in the picture
3 random colours of Tim Holtz distress stains
I reckon that's a good prize and well worth the 'no effort' required to have a go. I have.
Saturday, 2 April 2011
2.75" x 2.75"
That's how big this canvas is:
It isn't going on the tag, that is there to show you how it turned out after mopping up the spare ink from the other day. The canvas is the first one I've used which is so small - and I've got a couple even smaller!
I painted it all over with trad. tan Studio paint then used dusty concord distress stain all over including the edges. How quick a job these stains make, just brilliant.
I then used a lolly stick to 'splodge' some Indian coloured Terra over parts to give some depth and interest. I dried it sparingly with a heat gun before rubbing purple and gold metallic rubbing wax over it. I then gave it all a good spray with heirloom gold perfect pearls. Had to let that dry in the sun as I wanted to keep the droplets.
The flower is one of the ones I made when we went away the other week. Matches perfectly. I mounted it onto the small cog which I cut from grungepaper and coloured with the dusty concord again. The leaves are cut from paper using an MS punch.
Just look at the lovely sparkle from the perfect pearls spray.
To finish off, I added some seed beads and a bit of purple stickles.
What a fun little project. I've decided to use it as a centre piece for a large card. I placed it onto a fancy piece of paper I had previously punched using an MS round the edge punch, and placed the whole thing into the middle of an 8"x8" card. It looked super. Having said that, the card was white and it needs a cream one. So that's what I shall do.
Thanks for looking.
It isn't going on the tag, that is there to show you how it turned out after mopping up the spare ink from the other day. The canvas is the first one I've used which is so small - and I've got a couple even smaller!
I painted it all over with trad. tan Studio paint then used dusty concord distress stain all over including the edges. How quick a job these stains make, just brilliant.
I then used a lolly stick to 'splodge' some Indian coloured Terra over parts to give some depth and interest. I dried it sparingly with a heat gun before rubbing purple and gold metallic rubbing wax over it. I then gave it all a good spray with heirloom gold perfect pearls. Had to let that dry in the sun as I wanted to keep the droplets.
The flower is one of the ones I made when we went away the other week. Matches perfectly. I mounted it onto the small cog which I cut from grungepaper and coloured with the dusty concord again. The leaves are cut from paper using an MS punch.
Just look at the lovely sparkle from the perfect pearls spray.
To finish off, I added some seed beads and a bit of purple stickles.
What a fun little project. I've decided to use it as a centre piece for a large card. I placed it onto a fancy piece of paper I had previously punched using an MS round the edge punch, and placed the whole thing into the middle of an 8"x8" card. It looked super. Having said that, the card was white and it needs a cream one. So that's what I shall do.
Thanks for looking.
Thursday, 31 March 2011
INSPIRED BY GENIOUS
I mentioned yesterday, that I had made a tag inspired by Hels, it's this one.
I wanted a kick start to make something really nice and the tag that Hels had made did just that.
She was using new papers and stamps which obviously weren't tucked away in my work room, but it gave me the opportunity to use some lovely bits I already have - that's the name of the game anyway isn't it?
I covered a tag with paper from Tim's shabby vintage stash, gave it a watered down coat of traditional tan Studio paint and dried it. I smooshed some distress stains onto my craft sheet, sprayed them with water and pressed the tag into them. What an amazing effect this is. I even made another tag with the left over ink and that is just as lovely. I then used the sequin waste and dotty stamps from the Artistic Stamper, plus sable brown Stazon ink, to stamp over the top which I quickly wiped over with a baby wipe - after I had spent 20mins looking for the wipes - so much for the big clean up in January!!
How can you lose such a big box? It was actually staring me in the face in the cupboard above my head!
I then used black Archival to stamp Tim's swirl and the long words from his Stuff to Say stamps on the tag and then made a little matt with the saying on to sit over the top. I scribbled zig zags all around the tag and set it to one side whilst I made all the other bits.
Using Tim's flower ribbon and distress stains, I made the bit for the bottom of the tag and then ran the stains over 2 pieces of straight ribbon for the top. I then cut out about 7 flowers from Tim's tattered florals spikey flowers using his shabby vintage paper again, spritzed them with heirloom gold and edged them with walnut stain DI. The first flower is from my stash and is black card stamped with the sequin waste stamp. I rolled and bent the petals and held them together with a long fastener through one of Leonie's little wooden flowers.
Out came the box with my silicone glue to stick the flower down and all the bead pins etc. I fiddled with a couple of beads and made the 2 dangly ones at the top which are fastened on with one of Tim's mini safety pins.
I really enjoyed making this tag because I learnt some new techniques and the final result is lovely. I'm not taking credit for it because that belongs to Hels for sharing how she made her tag in the first place.
Got another to have a go at today so see you later - if I can concentrate on it instead of trying to work out the answers to Lindsay's quiz!!!!!!
I wanted a kick start to make something really nice and the tag that Hels had made did just that.
She was using new papers and stamps which obviously weren't tucked away in my work room, but it gave me the opportunity to use some lovely bits I already have - that's the name of the game anyway isn't it?
I covered a tag with paper from Tim's shabby vintage stash, gave it a watered down coat of traditional tan Studio paint and dried it. I smooshed some distress stains onto my craft sheet, sprayed them with water and pressed the tag into them. What an amazing effect this is. I even made another tag with the left over ink and that is just as lovely. I then used the sequin waste and dotty stamps from the Artistic Stamper, plus sable brown Stazon ink, to stamp over the top which I quickly wiped over with a baby wipe - after I had spent 20mins looking for the wipes - so much for the big clean up in January!!
How can you lose such a big box? It was actually staring me in the face in the cupboard above my head!
I then used black Archival to stamp Tim's swirl and the long words from his Stuff to Say stamps on the tag and then made a little matt with the saying on to sit over the top. I scribbled zig zags all around the tag and set it to one side whilst I made all the other bits.
Using Tim's flower ribbon and distress stains, I made the bit for the bottom of the tag and then ran the stains over 2 pieces of straight ribbon for the top. I then cut out about 7 flowers from Tim's tattered florals spikey flowers using his shabby vintage paper again, spritzed them with heirloom gold and edged them with walnut stain DI. The first flower is from my stash and is black card stamped with the sequin waste stamp. I rolled and bent the petals and held them together with a long fastener through one of Leonie's little wooden flowers.
Out came the box with my silicone glue to stick the flower down and all the bead pins etc. I fiddled with a couple of beads and made the 2 dangly ones at the top which are fastened on with one of Tim's mini safety pins.
I really enjoyed making this tag because I learnt some new techniques and the final result is lovely. I'm not taking credit for it because that belongs to Hels for sharing how she made her tag in the first place.
Got another to have a go at today so see you later - if I can concentrate on it instead of trying to work out the answers to Lindsay's quiz!!!!!!
Subscribe to:
Posts (Atom)